Smartphone Disassembly and Common Repairs
≈ 6 min read · Print / save as PDF
Find out which side opens first. Warm the glue, go in shallow with picks, and disconnect the battery before anything else. Test the new part before you glue the phone shut.
Opening a phone
Identifying the entry point
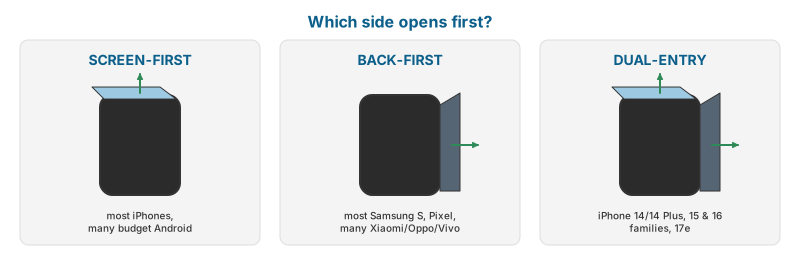
| Design | Entry | Examples |
|---|---|---|
| Screen-first | Heat and lift the display | Most iPhones; many Samsung A-series; budget Android |
| Back-first | Heat and lift the glass/plastic back | Most Samsung Galaxy S and Note, Google Pixel (varies by generation), many Xiaomi/Oppo/Vivo |
| Dual-entry | Back glass and display both removable separately | iPhone 14 and 14 Plus, all iPhone 15 and iPhone 16 models, and the iPhone 17e; iFixit’s 2025 teardowns reported that the iPhone 17 Pro and Pro Max returned to front-only access — check the teardown for any other model |
| Screwed back cover | Remove screws | Some rugged and repair-oriented phones (e.g. Fairphone) |
Always check a teardown or the manufacturer’s repair manual for the model before opening.
General opening procedure (screen-first, glued)
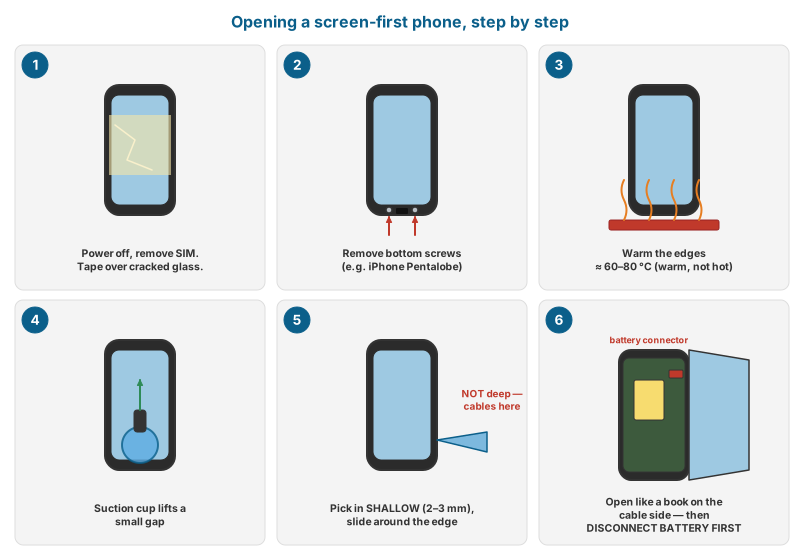
- Power off. Remove the SIM tray.
- If the screen is cracked, tape over it.
- Remove bottom screws if present (e.g. iPhone Pentalobe screws either side of the port).
- Heat the edges with a heat plate or heat gun to about 60–80 °C at the surface (warm, not hot — enough to soften adhesive; the battery is inside). Use a suction handle to lift a small gap.
- Insert an opening pick shallowly (2–3 mm) and slide it around the perimeter. Do not insert picks deep where display flex cables run (check the model — on iPhones the display cables are along one side, so the screen opens like a book in a specific direction).
- Open the screen like a book on the hinge side, supporting it — don’t strain the flex.
- Disconnect the battery connector first (remove its bracket screws), then the display connectors.
Back-first opening (glass back)
Heat the back glass more thoroughly (the adhesive on many Samsung/Pixel backs is strong), lift a corner with suction, insert picks around, and cut the adhesive. Watch for:
- The wireless charging coil and NFC attached to the back cover or the frame.
- Fingerprint sensors in the back on some models.
- Camera lens covers that are part of the back glass.
Electrically de-bonding battery adhesive (recent iPhones)
Recent iPhones (introduced on the iPhone 16 and 16 Plus and used on later models including the 16e and the iPhone 17 family) use an adhesive that releases when a low DC voltage is applied across the battery and the frame, as described in Apple’s official repair manuals. Follow the voltage, polarity and time given in the manual for the specific model. iFixit’s iPhone 17 Pro teardown also reported a battery attached to a screwed-in metal tray, which simplifies battery replacement on that model.
Screen replacement (module)
Connecting or disconnecting a screen while the battery is connected. This is the most common way beginners burn backlight and display power circuits.
- Open, disconnect battery, disconnect display.
- Transfer parts that do not come with the new screen: earpiece speaker, front camera/sensor assembly, brackets, (older iPhones: Home button/Touch ID — must be the original to keep Touch ID working).
- Test the new screen before sealing: touch across the whole area (draw lines in a paint app or use a touch test), brightness, colour uniformity, proximity sensor (call test — screen should turn off near the ear), auto-brightness, Face ID (iPhone), fingerprint (under-display sensors on Android often need calibration via the manufacturer’s service tool or a specific procedure after screen replacement — and some ultrasonic sensors only work with certain screen types).
- Clean old adhesive from the frame thoroughly; apply new pre-cut adhesive or appropriate glue.
- Reassemble, press evenly, clamp if using liquid adhesive.
- Final QC (Appendix B).
Water resistance: Once opened, a phone’s factory water resistance cannot be guaranteed even with new adhesive. Tell the customer, in writing, before the repair.
Battery replacement
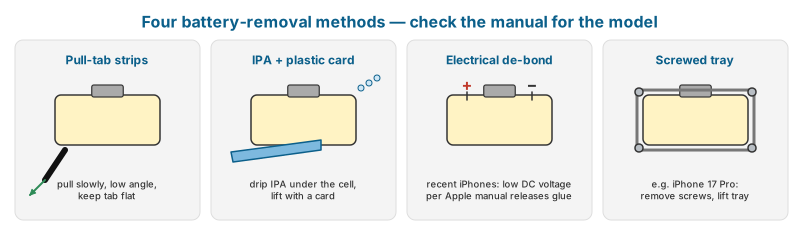
- Confirm need: health below 80%, swelling, shut-downs at high percentage, or service message.
- Discharge the old battery to below about 25% before removal where possible — a lower state of charge reduces fire severity if the battery is punctured.
- Remove using the model’s method (pull-tabs, IPA with plastic cards, electrically de-bonding adhesive, or screwed tray).
- Install new adhesive and battery; connect only after all brackets are aligned.
- Calibrate if needed (normally automatic over a few charge cycles).
On iPhones, a non-genuine battery or one not configured with Repair Assistant will show a message in Settings and may not display health information (Chapter 15).
Charging port
Clean the port with a non-metal pick before quoting a replacement. Pocket lint is the most common “broken port”.
| Symptom | Likely cause |
|---|---|
| Charges only at certain cable angles | Lint in the port (clean with a non-conductive pick before quoting a port replacement — very common), worn port contacts |
| Not charging, “moisture detected” (Samsung) | Moisture or corrosion; dry and clean; inspect port |
| Charges slowly, no fast charging | Cable/charger, CC line fault, port |
| Not charging at all, other ports fine | Port flex, charging IC, main flex (Android sub-board design) |
| Mic not working during calls (on phones with mic on the port flex) | Port flex damage |
Cameras
- Rear camera blurry: check for damaged lens glass (replace lens cover — cheap), cracked module, or OIS (optical image stabilisation) failure (rattling or shaking image — module replacement).
- Camera black/not opening: check module connector; try a known-good module.
- iPhone cameras on recent models are tracked by the system; non-genuine or unconfigured cameras show a message (Chapter 15).
Speakers, microphones and buttons
- Low earpiece volume: often blocked mesh. Clean carefully before replacing.
- Buttons not working: power/volume flex cable or button contacts; on some phones the button flex is part of a larger assembly.
- Vibration motor (Taptic Engine on iPhones): replace module.
Back glass
- On dual-entry iPhones (14/14 Plus, the 15 and 16 families, 17e) and many Androids, back glass is replaceable as a separate part.
- On iPhone models where the back glass is bonded to the housing (iPhone 8 through the iPhone 13 family, and the iPhone 14 Pro/Pro Max), the options are: full housing replacement, or back-glass removal with a laser machine followed by a new glass.
Quality check after every phone repair
Use the full QC checklist in Appendix B: display, touch, all cameras, flash, speakers, earpiece, microphones (record a video and a voice memo), proximity, Wi-Fi, Bluetooth, cellular call, SIM detection, charging (wired, wireless), buttons, vibration, biometrics, sensors, NFC, GPS.
Watch and read
- Watch: iPhone screen replacement — YouTube search: iPhone screen replacement
- Watch: Back-first Samsung opening — YouTube search: Samsung back glass removal and screen replacement
- Watch: Electrical de-bond battery removal — YouTube search: iPhone battery replacement electrically released adhesive
- Watch: Charging port replacement — YouTube search: USB-C charging port replacement phone
- Read/use: iFixit repair guides — Thousands of free photo guides and teardowns, organised by device.
- Read/use: Apple iPhone repair manuals — Official step-by-step manuals: screw charts, adhesive and battery de-bond procedures.
Review questions
- Name the safest first step after opening a phone.
- Why should you not insert opening picks deep into an iPhone near the display flex side?
- Why should a phone battery be partially discharged before removal?
- Before quoting a port replacement, what should always be tried?
- What must you tell customers about water resistance after a repair?
Lab exercises
Lab 13.1 — Screen replacement on a screen-first phone and a back-first phone (scrap or practice devices).
Lab 13.2 — Battery replacement using pull-tabs, and one using IPA.
Lab 13.3 — Charging port replacement (Android sub-board) and full QC.