Board-Level Smartphone Repair
≈ 5 min read · Print / save as PDF
Replace the battery with a bench power supply and watch the current meter. The pattern tells you whether the phone is shorted, dead, stuck or boot-looping — before you touch a component.
The DC power supply method
The bench DC power supply is the phone technician’s most powerful diagnostic tool. Instead of the battery, you power the board through a battery boot cable (a cable with the model’s battery connector) and watch the current meter.
Setup
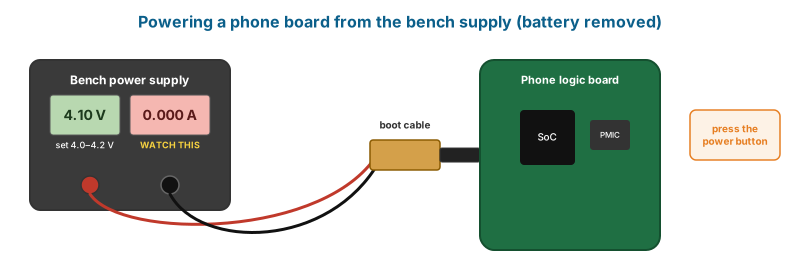
- Remove the battery. Connect the boot cable to the board’s battery connector.
- Set the supply to about 4.0–4.2 V (simulating a charged battery). Set an initial current limit around 1 A and raise it to about 2–3 A for boot testing once you are sure there is no hard short.
- Note the current before pressing the power button (leakage), then press power and watch the pattern.
Interpreting current behaviour
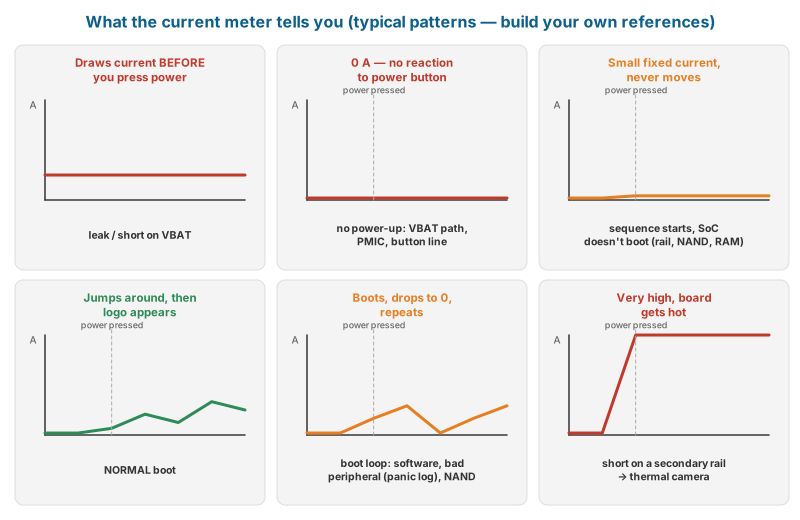
Use these as typical patterns; always build your own known-good references per model.
| Observation | Interpretation |
|---|---|
| Current flows immediately without pressing power (anything above a few mA) and supply may hit the limit | Leakage/short on VBAT or a VBAT-connected component (commonly a capacitor, PMIC, charging IC, power amplifier, backlight/display power circuit) |
| 0 mA, no response to power button | No power-up: open VBAT path, PMIC not starting, power button line fault, missing always-on rail; check the button signal and VBAT at the PMIC |
| Small fixed current (e.g. tens of mA) that never progresses | Power sequence starts but SoC does not boot — missing rail, faulty storage, RAM, SoC, or clock |
| Rises, fluctuates (typically between about 0.1 and 0.5 A or more) and the logo appears | Normal boot behaviour |
| Boots, then drops to 0 and repeats | Boot loop — software, faulty peripheral (panic log on iPhone), storage error |
| Very high current on boot, phone gets hot | Short on a secondary rail, often near the SoC/PMIC; use a thermal camera |
Finding shorts on phone boards
No thermal camera yet? Brush a thin film of IPA over the area while injecting. The spot where the alcohol evaporates first is the hot component.
- Identify the shorted line: diode mode on VBAT, the main PMIC output rails (inductor outputs), and connector power pins.
- Inject at a safe voltage (for VBAT: up to its normal ~4 V; for lower rails, start at 0.5–1 V) with current limited.
- Locate heat: thermal camera, IPA, rosin smoke/freeze spray method.
- Remove the hot component and re-measure. Capacitors on VBAT can often be removed without replacement if the boardview/schematic shows many in parallel — but the correct repair is to replace with the right value; removing filter capacitors can cause instability.
- If the short is inside a chip (PMIC, charging IC, power amplifier), replace the chip — BGA/QFN rework with correct parts from reputable suppliers.
Common Android board faults
| Fault | Typical area |
|---|---|
| No charging after using a bad charger | Charging IC, OVP (over-voltage protection) IC/MOSFET near the port, TVS diode on VBUS shorted |
| Dead after liquid | Corroded VBAT capacitors, PMIC, button lines |
| Display black but phone works (vibrates, rings) | Display connector, display power rails (often generated by a dedicated display power IC), backlight circuit on LCD models |
| No network after a drop | RF section, antenna connectors/cables, power amplifier |
| Stuck on logo, will not flash | Storage (eMMC/UFS) failure — requires chip replacement and correct firmware programming; data is not recoverable from encrypted storage |
Liquid damage procedure
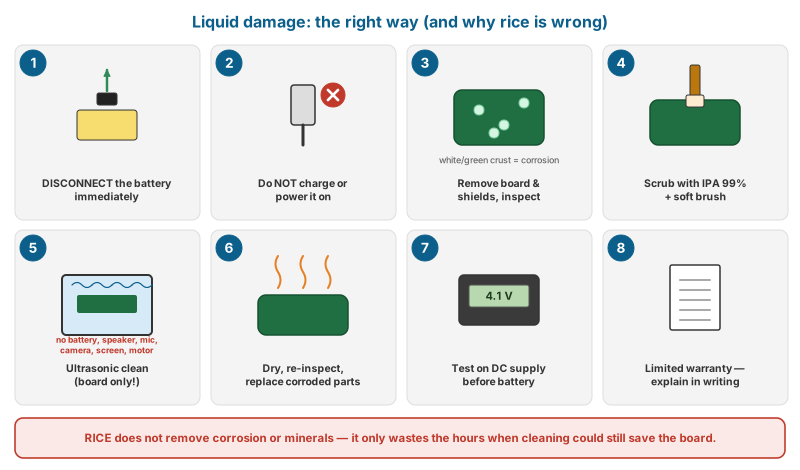
Liquid damage is time-critical: corrosion progresses while the battery is connected.
- Disconnect the battery immediately on intake (with customer consent). Do not try to power on or charge the phone.
- Do not use rice. It does not remove corrosion or minerals, and delays real treatment.
- Disassemble completely; remove the board.
- Inspect under the microscope: white/green corrosion, residues, discoloured connectors.
- Remove shields where they come off (clip-on) or where practical; corrosion hides under them.
- Clean: scrub with a soft ESD brush and IPA 99%; for heavy contamination use an ultrasonic cleaner with an appropriate cleaning solution or IPA — follow the cleaner’s instructions. Do not put batteries, speakers, microphones, cameras, vibration motors or displays in the ultrasonic bath. Some technicians also avoid putting boards with MEMS components (some microphones are on the board) in ultrasonic baths — know where these are on your model.
- Dry thoroughly (warm air, low heat, or a drying cabinet).
- Re-inspect; replace corroded components and repair broken traces.
- Test on the DC power supply before connecting a battery.
- Warranty: Liquid-damaged devices can develop new faults weeks later as residual corrosion spreads. Give a limited or no warranty, explained in writing.
Data recovery from dead phones
Modern iPhones and Android phones (with file-based encryption) tie encryption keys to the original SoC and its secure hardware. Data can only be recovered by repairing the original board to a booting state (or at least enough for the phone to unlock and be backed up). Chip-off recovery used on old, unencrypted devices does not work on modern phones. Price data-recovery jobs as board repairs with a clear “no data, no fee” or “diagnostic fee” policy.
Watch and read
- Watch: DC power supply diagnosis — YouTube search: iPhone DC power supply diagnosis
- Watch: Board repair from iPad Rehab — YouTube search: iPad Rehab Jessa Jones microsoldering
- Watch: Liquid-damage cleaning — YouTube search: liquid damage phone board cleaning ultrasonic
Review questions
- Why is the current before pressing power the first value to read?
- Interpret: phone draws 0.040 A after pressing power and never changes.
- Why is rice not a liquid-damage treatment?
- Which parts must never go into an ultrasonic cleaner?
- Why can’t data from a dead modern phone be recovered by moving the storage chip?
Lab exercises
Lab 16.1 — Build a current-draw reference sheet for three phone models (idle, power-on, boot).
Lab 16.2 — Locate a VBAT short (instructor-created) with injection and thermal camera.
Lab 16.3 — Clean a liquid-damaged scrap board fully and document before/after under the microscope.
Lab 16.4 — Replace a charging-port OVP/TVS component on a scrap Android board.