Apple iPhone and iPad Repair
≈ 8 min read · Print / save as PDF
iPhones record which parts belong to them. Genuine parts plus Repair Assistant give full function; other parts show a message. Try “Update” before “Restore”, because Restore erases everything.
Identifying the model
Never rely on what the customer says. Check:
- Settings → General → About (model name and model number; tap the model number to toggle the “A” number such as A3106).
- The “A” model number inside the SIM tray slot or on the back (older models).
- The IMEI/serial (Settings,
*#06#, or the SIM tray on some models). Apple’s “Check Coverage” page shows warranty status from the serial.
Parts pairing, Parts and Service History, and Repair Assistant
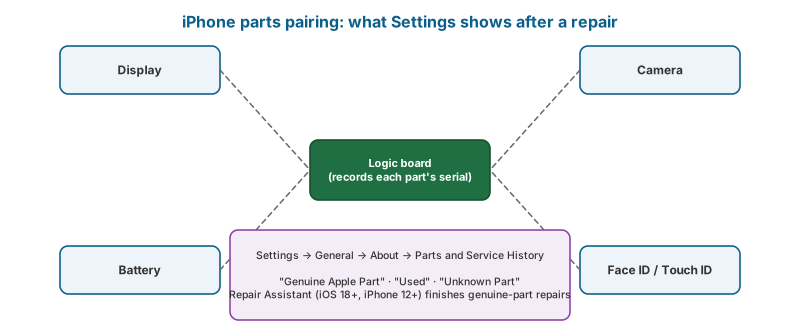
Apple serialises many iPhone parts and records them against the logic board. Since iOS 15.2, iPhones show a Parts and Service History section in Settings → General → About after a repair, listing replaced parts and whether each is Genuine Apple Part, Used (a genuine part previously installed in another iPhone), or Unknown Part (non-genuine or not configured).
Repair Assistant (introduced in iOS 18 for iPhone 12 and later) is the on-device tool that finishes a repair: it checks, calibrates and configures new and used genuine parts — batteries, displays, cameras, and others — so they function fully. It runs from Settings → General → About → Parts and Service History (or is prompted automatically). Apple’s iPhone repair documentation states that Repair Assistant also updates firmware and checks whether previously used parts are associated with a device that has Activation Lock enabled — Apple extended Activation Lock to parts to discourage disassembly of stolen iPhones. Requirements stated by Apple include the latest (non-beta) iOS and an internet connection.
Logic-board replacements need Apple’s System Configuration step (not available to independent shops unless they are enrolled in Apple’s programmes).
What this means in practice
| Part | Genuine part + Repair Assistant | Non-genuine/unconfigured part |
|---|---|---|
| Battery | Full health reporting | “Unknown Part” message; battery health may not be shown |
| Display | True Tone and full functionality | Message in Settings; True Tone may be unavailable; some technicians use display programmers to transfer the original screen’s calibration data on supported models |
| Camera | Full functionality | Message; some features may not work correctly |
| Face ID (TrueDepth) | Apple service | Face ID is cryptographically paired; component-level third-party Face ID repair (transferring the original dot projector components) is a highly advanced microsoldering task |
| Touch ID (iPhone 5s–8 Home button; SE 2nd/3rd gen) | Apple service only | Touch ID will not work with a replacement Home button; button press may still work on some models |
Apple’s parts programmes (check availability in your country)
- Self Service Repair — genuine parts, tool rental and manuals sold to individuals (in participating countries).
- Independent Repair Provider (IRP) programme — for businesses; free to join; provides genuine parts, tools, training and diagnostics.
- Genuine Parts Distributor programme — launched in 2025 in the US and Europe, letting repair shops buy genuine parts through third-party distributors.
- Apple Authorized Service Providers (AASP) — full authorised service.
Apple publishes free official repair manuals for supported iPhones (support.apple.com, search “iPhone repair manual” + model). These include screw charts, torque values, adhesive procedures, and the de-bonding voltages for battery adhesive. Use them.
Availability note: Which of these programmes operate in the Philippines changes over time. Check Apple’s official pages before planning your parts supply around them.
Recovery mode, DFU mode, update and restore
Connect the iPhone to a Mac (Finder), or a Windows PC with the Apple Devices app (or iTunes on older Windows versions).
Recovery mode
| Model | Method |
|---|---|
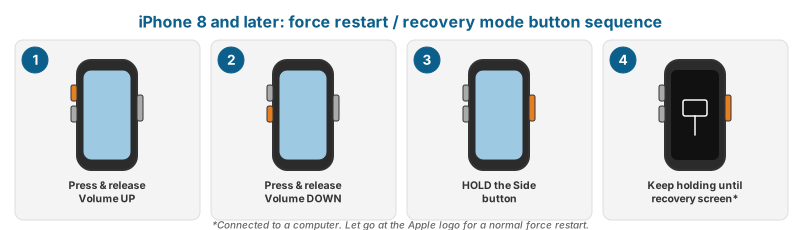
| iPhone 8 and later (including SE 2nd/3rd gen) | Press and release Volume Up, press and release Volume Down, then press and hold the Side button until the recovery-mode screen (computer + cable) appears |
| iPhone 7 / 7 Plus | Hold Side + Volume Down until the recovery screen |
| iPhone 6s and earlier (SE 1st gen) | Hold Home + Side/Top until the recovery screen |
DFU mode (Device Firmware Update)
Deeper than recovery mode; the screen stays black. For iPhone 8 and later: press and release Volume Up, press and release Volume Down, hold the Side button about 10 s; while still holding Side, also hold Volume Down for about 5 s; release Side but keep holding Volume Down about 10 s more. The computer reports a device in recovery; the iPhone screen remains black. (If the Apple logo appears, you held too long — start again.)
Update vs. Restore
- Update reinstalls iOS without erasing data — try this first for a phone stuck on the logo or in a boot loop.
- Restore erases the device and installs the latest signed iOS. Apple only signs current versions, so downgrades are generally impossible.
- After restore, an iPhone with Find My enabled requires the owner’s Apple Account password (Activation Lock).
Restore errors
Apple’s support article on iPhone update and restore errors explains the codes. In shop practice:
- First rule out the cable, port, computer, and software version (use a known-good USB cable directly into the computer, update macOS/Apple Devices, try another computer).
- Errors that persist on known-good setups (Apple lists codes such as 9, 4005, 4013 and 4014 as indicating a possible hardware issue or connection problem) commonly point to logic-board faults — frequently storage (NAND), its power rails, or the SoC area — and move the job to board-level diagnosis.
Activation Lock
Never offer “iCloud unlock” services. Only the owner (or Apple, with proof of purchase) can remove Activation Lock.
Activation Lock ties an iPhone to the owner’s Apple Account. Only two legitimate ways exist to remove it: the owner signs in / removes the device from their account (iCloud.com → Find Devices → Remove), or the owner obtains help from Apple with proof of purchase. A shop must not accept devices for “iCloud unlock” services.
Shop intake procedure: Ask the customer to confirm their Apple Account password works, or — when a repair needs it — to turn off Find My before handing over the device. For screen/battery repairs where the phone works, Find My can often stay on; the customer can authenticate at pickup.
Diagnostics on iPhone
| Tool | Information |
|---|---|
| Settings → Battery → Battery Health | Maximum capacity, peak performance capability, service message |
| Settings → General → About → Parts and Service History | Replaced parts and their status |
| Settings → Privacy & Security → Analytics & Improvements → Analytics Data | Panic logs (panic-full-… files) — key for diagnosing reboot loops |
| Apple Diagnostics (via Apple’s service flow) | Full hardware diagnostics, accessible to customers through Apple Support and to enrolled providers |
| Third-party PC utilities (e.g. 3uTools) | Read device information, battery data and logs over USB; use only for information and data-safe functions |
Reading panic logs
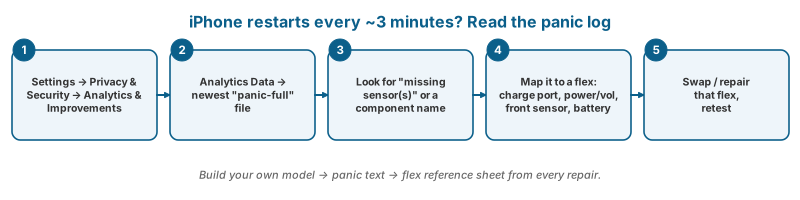
An iPhone that reboots roughly every three minutes usually has a peripheral it cannot detect (the system watchdog panics when a sensor stops responding). Open the latest panic-full file and look for text indicating missing sensors or a specific component. Typical culprits are damaged charge-port flexes, power/volume flexes, front sensor flexes, or the battery data line — each model’s panic strings map to particular flexes. Build a reference sheet from your own repairs and technician references for each model.
Common iPhone board-level faults (well documented)
| Fault | Models commonly affected | Cause |
|---|---|---|
| “Touch disease” — grey flickering bar, intermittent touch | iPhone 6 Plus, 6 | Touch IC solder joints cracking due to board flex |
| “Audio IC / loop disease” — no audio on calls, greyed speaker button, slow boot | iPhone 7, 7 Plus | Audio codec IC pad separation |
| No service / baseband failure | iPhone 7, 7 Plus (certain Qualcomm/Intel variants) | Baseband chip connection failure |
| Charging IC (Tristar/Hydra) failure | iPhone 5 through 8-era models; also others | Poor-quality chargers; symptoms include fast battery drain, no charging, false charging |
| Backlight failure | LCD models | Backlight filter/fuse/coil damage, often after a poorly-installed screen with power still connected |
| Stacked-board interposer failure | iPhone X and later | Drops cause separation; symptoms vary (no service, no Wi-Fi, no boot) |
Never connect or disconnect a screen with the battery connected. This is the most common way inexperienced technicians destroy backlight circuits on LCD iPhones and display power lines on OLED models.
iPad notes
- iPads use the same pairing/Repair Assistant framework (iPadOS 18+ for supported models).
- Most iPad screens are glued with strong adhesive over a large area; use a heat mat and many picks. Digitiser (touch glass) and LCD are separate on many older/budget iPads.
- iPad charging-port faults are common; often the port is soldered to the logic board (requires microsoldering).
Watch and read
- Watch: Entering DFU mode — YouTube search: iPhone DFU mode
- Watch: Repair Assistant in action — YouTube search: iPhone Repair Assistant parts and service history
- Watch: Reading iPhone panic logs — YouTube search: iPhone panic full log reboot every 3 minutes
- Read/use: Apple: Use Repair Assistant — Which parts each iPhone/iPad model can calibrate, and how to finish a repair.
- Read/use: Apple: restore errors 9, 4005, 4013, 4014 — Official troubleshooting for the most common restore errors.
- Read/use: Apple iPhone repair manuals — Official step-by-step manuals: screw charts, adhesive and battery de-bond procedures.
Review questions
- Where in Settings can you see whether a replaced part is genuine?
- What does Repair Assistant do, and from which iPhone model does it support?
- Give the recovery-mode key sequence for an iPhone 13.
- What is the difference between Update and Restore?
- What are the two legitimate ways to remove Activation Lock?
- An iPhone reboots every three minutes. What do you check first?
Lab exercises
Lab 15.1 — Put iPhones of three generations into recovery and DFU modes; perform an Update.
Lab 15.2 — Read and interpret panic logs from a test device with a deliberately disconnected sensor flex.
Lab 15.3 — Screen replacement on an iPhone using the Apple repair manual’s procedure; record the Parts and Service History afterwards.