Android Systems and Software Repair
≈ 5 min read · Print / save as PDF
Know the exact model number, use only official firmware, and remember that most flashing erases data. Never bypass Google account locks for a device whose owner you cannot verify.
Boot modes
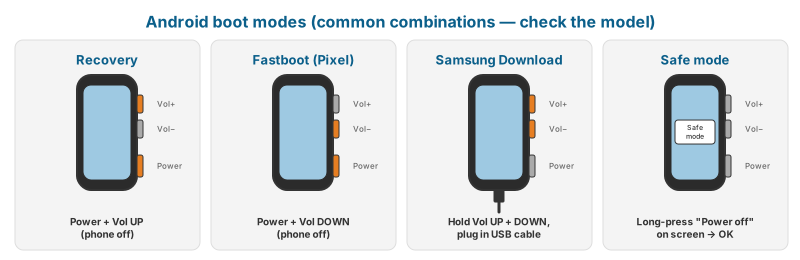
| Mode | How to enter (common methods; vary by maker and model) | Use |
|---|---|---|
| Recovery | Power off, hold Power + Volume Up (many brands); some need the phone connected to a PC | Wipe cache (older versions), factory reset, apply official updates |
| Bootloader / Fastboot | Power + Volume Down (Pixel, many others), or adb reboot bootloader |
Flash factory images with fastboot (Pixel and others with unlockable bootloaders) |
| Samsung Download Mode | Power off, connect USB cable while holding Volume Up + Volume Down (current models) | Flash official firmware with Odin |
| Safe mode | Long-press “Power off” on screen, then confirm Safe mode | Diagnoses third-party app problems |
| Qualcomm EDL (Emergency Download, appears as “Qualcomm HS-USB QDLoader 9008” in Windows) | Entered by the device when the bootloader is damaged, or via test points | Low-level flashing with authorised manufacturer tools; many current devices require signed/authorised access |
| MediaTek BROM / Preloader | Entered with key combos or when firmware is damaged | Low-level flashing with SP Flash Tool and correct firmware |
Firmware flashing — the responsible approach
- Identify the exact model number (e.g. Samsung
SM-A556E— not just “A55”), region/CSC, and current firmware version (Settings → About phone; or the label/sticker). The model number determines which firmware is correct. - Use official firmware only from the manufacturer (Google publishes factory images for Pixel; Samsung firmware is distributed through official channels and widely mirrored — verify file integrity and version).
- Never downgrade across a bootloader/security version that the device does not allow — anti-rollback protection can hard-brick the phone or the flash will simply fail.
- Explain data loss: most full flashes erase data. Samsung’s Odin has a “HOME_CSC” file option that attempts to preserve data; “CSC” erases. Even HOME_CSC is not a guaranteed data-safe operation — back up first if the phone boots.
- Charge the phone to over 50% before flashing.
Samsung Odin procedure (overview)
- Install Samsung USB drivers on the PC.
- Extract the firmware: files labelled BL, AP, CP, CSC (and HOME_CSC).
- Put the phone in Download Mode, connect; Odin shows a COM port.
- Load BL, AP, CP, and CSC or HOME_CSC into the matching slots.
- Start; wait for PASS. Do not disconnect.
Google Pixel
Pixel devices can be restored with Google’s web-based Android Flash Tool or with fastboot using the factory image. Flashing factory images requires an unlocked bootloader, and unlocking the bootloader erases the device. On a device where “OEM unlocking” is disabled and the phone won’t boot, use Google’s official rescue/repair routes.
ADB basics
With USB debugging enabled (Settings → About phone → tap Build number 7 times → Developer options → USB debugging):
| Command | Use |
|---|---|
adb devices |
Confirm connection |
adb shell getprop ro.product.model |
Read model |
adb shell dumpsys battery |
Battery level, temperature, voltage, status |
adb logcat |
System logs (crash diagnosis) |
adb reboot recovery / adb reboot bootloader |
Reboot into modes |
adb pull /sdcard/DCIM |
Copy photos (data backup with customer permission) |
Diagnostic menus and codes
These are built into many devices. Availability varies by manufacturer, carrier and software version:
| Code / app | Device | Opens |
|---|---|---|
*#0*# |
Samsung (many models) | Hardware test menu (screen colours, touch, sensors, speaker, vibration, camera) |
| Samsung Members app → Diagnostics | Samsung | Guided hardware tests |
*#*#4636#*#* |
Many Android phones | Phone/battery/Wi-Fi testing information |
*#06# |
All phones (GSM standard) | Displays IMEI |
| Pixel: Settings / built-in diagnostics app (varies by model) | Pixel | Hardware tests |
Factory Reset Protection (FRP) — ethics and procedure
If the customer cannot sign in to the Google account and cannot prove ownership, do not unlock the phone. Shops that do this end up handling stolen phones.
After a factory reset, a phone with a Google account previously added will ask for that Google account before it can be used. This is FRP — an anti-theft feature.
Shop policy:
- The legitimate solution is for the owner to sign in with their Google account (they can recover the password via Google account recovery), or to provide proof of purchase to the manufacturer’s service centre.
- Do not bypass FRP on devices whose ownership is not verified. “Bypass” tools and services are widely advertised; using them for unverified devices makes the shop part of the stolen-phone trade.
- Prevention: Before accepting a phone for a repair that might need a reset, ask the customer to confirm they know their Google account credentials, or to remove the account themselves.
Network, IMEI and blacklisting
- The IMEI identifies the device on mobile networks. Changing an IMEI (“IMEI repair”) is illegal in many jurisdictions and is a strong indicator of trafficking in stolen phones. Do not offer it.
- If an IMEI is missing/“null” after a board repair (e.g. after damaged EFS/NV data), the legitimate route is the manufacturer’s authorised service.
- In the Philippines, SIM registration is mandatory under the SIM Registration Act (RA 11934). Customers having signal problems should be checked for SIM registration status, the SIM itself, and APN settings before any hardware diagnosis.
Common Android software faults
| Fault | Approach |
|---|---|
| Boot loop after update | Wipe cache partition if available in recovery; otherwise reflash the same firmware version with HOME_CSC (Samsung) or sideload the official OTA |
| Stuck on logo | Safe mode; then reflash |
| Battery drain | Check battery usage by app; battery health; background apps; update |
| Overheating | Check for runaway apps; failing battery; charging port moisture; board fault (short pulling current) |
| “Moisture detected” | Dry the port; inspect; clean with IPA; replace port if corroded |
Watch and read
- Watch: Flashing Samsung with Odin — YouTube search: Samsung Odin flash official firmware tutorial
- Watch: Restoring a Pixel with Android Flash Tool — YouTube search: Android Flash Tool Pixel
- Read/use: Android Platform Tools (ADB/Fastboot) — Official Google command-line tools.
- Read/use: Android Flash Tool — Flash official Pixel images from a Chrome/Edge browser.
- Read/use: Pixel factory images — Official full firmware images for Google Pixel phones.
Review questions
- Why must you identify the exact model number before downloading firmware?
- What is anti-rollback protection?
- Explain the difference between CSC and HOME_CSC in Odin.
- What is FRP and what is the legitimate way to remove it?
- Why should a shop never offer IMEI changes?
Lab exercises
Lab 14.1 — Flash official firmware on a Samsung test device with Odin and verify.
Lab 14.2 — Use ADB to read battery data and collect a logcat from a crashing app.
Lab 14.3 — Run the full hardware diagnostics on three Android phones and record results.