Operating Systems, Storage and Data
≈ 6 min read · Print / save as PDF
Before you touch software, protect the data. Ask the customer if it is backed up, check whether the drive is encrypted, and never work directly on a failing drive.
Storage technologies
| Type | Interface | Typical sequential speed | Failure symptoms |
|---|---|---|---|
| HDD | SATA | ~100–250 MB/s | Clicking, slow, bad sectors, not detected |
| SATA SSD | SATA (2.5” or M.2) | up to ~550 MB/s (SATA III limit 6 Gb/s) | Sudden disappearance, read-only mode, firmware lockups |
| NVMe SSD | PCIe (M.2) | ~2,000–14,000 MB/s depending on PCIe generation | Overheating throttling, sudden failure, not detected |
| eMMC | Soldered | Slow | Common in budget laptops/Chromebooks; failure requires board-level work |
Reading drive health (S.M.A.R.T.)
Key attributes:
- Reallocated Sectors Count (HDD/SSD) — any rising count indicates failing media.
- Current Pending Sector Count — sectors waiting to be remapped; a strong warning on HDDs.
- Uncorrectable Sector Count.
- Percentage Used / Wear Leveling Count / Available Spare (SSDs/NVMe) — remaining endurance.
- Media and Data Integrity Errors (NVMe) — should be zero.
A drive showing pending or reallocated sectors should be backed up immediately and replaced.
Installing Windows
- Create installation media with Microsoft’s Media Creation Tool (or download the ISO and write it with Rufus).
- Windows 11 requires TPM 2.0, Secure Boot capability, UEFI, and a supported CPU. Enable fTPM/PTT in BIOS if the board has it.
- Boot from USB (boot menu key), choose Custom: Install Windows only, delete or select partitions, install.
- If the installer does not see an NVMe drive on some Intel laptops, the system may be in Intel RST/VMD mode: load the Intel RST/VMD driver from the laptop maker’s support page during setup, or (only on a fresh install with no data to preserve) change the storage mode in BIOS.
- After installation: run Windows Update, install chipset/graphics/manufacturer drivers from the device maker’s support page, activate Windows (digital licences on most branded PCs reactivate automatically when reinstalling the same edition).
Licensing: Install only genuine, properly licensed operating systems and software. Installing pirated software for customers exposes the shop to legal risk and the customer to malware.
Windows recovery tools
| Tool | Use |
|---|---|
| Windows Recovery Environment (WinRE) — reached by interrupting boot three times or holding Shift while clicking Restart | Startup Repair, System Restore, Uninstall Updates, Command Prompt, Reset this PC |
sfc /scannow |
Repairs protected system files |
DISM /Online /Cleanup-Image /RestoreHealth |
Repairs the component store (run before sfc if sfc fails) |
chkdsk C: /f |
Repairs file-system errors (use /r only after backing up a suspect drive — surface scans stress failing disks) |
bootrec /fixmbr, /fixboot, /rebuildbcd; bcdboot C:\Windows |
Boot repair |
| Reset this PC (keep files / remove everything) | Reinstall while optionally keeping user files |
BitLocker and device encryption — critical warning
No recovery key = no data, forever. Check encryption and get the key BEFORE changing BIOS settings or replacing a board.
Many Windows 11 devices have Device Encryption/BitLocker enabled automatically when the user signs in with a Microsoft account. If you:
- change BIOS settings (Secure Boot, TPM, boot order in some cases),
- update the BIOS,
- replace the motherboard, or
- move the drive to another PC,
the device may ask for the BitLocker recovery key. Without it, the data is unrecoverable. Before any such work, check encryption status (manage-bde -status in an administrator Command Prompt) and ask the customer to obtain their recovery key (usually saved to their Microsoft account at account.microsoft.com/devices/recoverykey). Record this step on the job form.
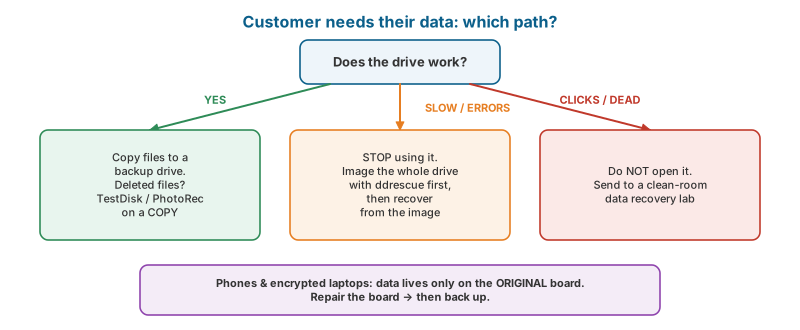
Similarly, Macs with FileVault, and all modern iPhones and Android phones, encrypt storage with keys tied to the device hardware. On these devices, data cannot be recovered by removing the storage chip and reading it elsewhere — recovery means making the original board work again.
Data backup and recovery
Shop policy
- Always ask whether the customer needs their data and whether it is backed up. Get written acknowledgement (Appendix B) that repairs may cause data loss.
- Copy customer data only with permission, only for the purpose requested, and delete shop copies after handover (see the Data Privacy Act discussion in Chapter 18).
Logical recovery (drive is healthy, files deleted or partition lost)
Use recovery software (e.g. TestDisk/PhotoRec, which are free and open-source) on a clone or image, not on the original drive, when possible. Never install recovery software onto the drive you are recovering from.
Failing drive recovery
- Stop using the drive immediately; every hour of operation can worsen damage.
- Image the drive sector-by-sector with a tool that handles bad sectors gracefully — GNU ddrescue on Linux is the standard free tool. It copies good areas first and retries bad areas later.
- Work from the image.
- Clicking HDDs, drives not spinning, or drives with physical damage need a professional data-recovery lab with a clean room. Do not open a hard drive — dust destroys the platters.
Malware removal
- Disconnect from the network.
- Boot into Safe Mode or use an offline scanner.
- Scan with Microsoft Defender (including Microsoft Defender Offline scan) and a second-opinion scanner.
- Remove unknown startup items, scheduled tasks, and browser extensions.
- Reset browsers; change passwords from a clean device.
- For ransomware: do not pay through the shop; check whether a legitimate decryptor exists (No More Ransom project); otherwise restore from backup. For serious infections, a clean reinstall after backing up personal files (not programs) is the safest outcome.
Upgrades that sell
| Upgrade | Customer benefit |
|---|---|
| HDD → SSD (with cloning) | The most dramatic speed improvement for older PCs and laptops |
| RAM increase (e.g. 4 GB → 8/16 GB) | Multitasking, browser performance |
| Cleaning + thermal paste | Lower temperature, quieter fans, less throttling |
| Wi-Fi card upgrade | Better connectivity |
| OS reinstall + optimisation | Fresh, fast system |
Cloning a drive to SSD
Use the SSD maker’s cloning tool or another reputable cloning program. Check the target is at least as large as the used space, ensure the partition style (GPT/MBR) matches the boot mode (UEFI/Legacy), and verify the clone boots before returning the original drive to the customer.
Watch and read
- Watch: Clean Windows 11 install — YouTube search: clean install Windows 11 USB
- Watch: Cloning a drive to SSD — YouTube search: clone HDD to SSD
- Watch: Imaging a failing drive — YouTube search: ddrescue failing drive tutorial
- Read/use: Windows 11 download (Microsoft) — Official installation media and Media Creation Tool.
- Read/use: Ventoy — Put many bootable ISO files on one USB drive.
- Read/use: TestDisk & PhotoRec — Recover lost partitions and deleted files.
- Read/use: GNU ddrescue — Image a failing drive safely before recovery.
- Read/use: Microsoft BitLocker recovery key — Where customers find their recovery key (Microsoft account).
Review questions
- Which S.M.A.R.T. attributes indicate a failing drive?
- Why is BitLocker a critical consideration before BIOS changes or board replacement?
- Why should a failing drive be imaged with ddrescue rather than scanned with chkdsk /r?
- Why can’t a technician recover iPhone data by reading the storage chip on another board?
Lab exercises
Lab 8.1 — Clean install. Install Windows 11 on a test PC including all drivers. Document the time taken.
Lab 8.2 — Recovery. Delete a test partition and recover it with TestDisk.
Lab 8.3 — Clone. Clone an HDD to an SSD and verify boot.
Lab 8.4 — BitLocker. Enable BitLocker on a test machine, trigger recovery mode by changing a Secure Boot setting, and recover using the key.