Part III — Laptops · Chapter 10
Common Laptop Repairs
≈ 4 min read · Print / save as PDF
Most laptop jobs are part swaps: screen, keyboard, battery, port, hinge, cooling. Match the exact part number, test before closing, and look out for swollen batteries.
Screen (panel) replacement
- Identify the exact panel part number printed on the label on the back of the existing panel. Panels with the same size can differ in resolution, refresh rate (60/120/144/165 Hz…), connector (30-pin vs 40-pin eDP), touch, brightness, colour gamut, and mounting (screw tabs vs. adhesive).
- Disconnect the battery.
- Remove the bezel (clips/adhesive) or, on bezel-less designs, separate the glued panel with plastic cards and gentle heat.
- Disconnect the eDP cable (usually a taped connector on the back of the panel — remove tape, pull straight out).
- Fit the new panel, connect, test before final assembly, then reassemble.
Diagnosing “no display”
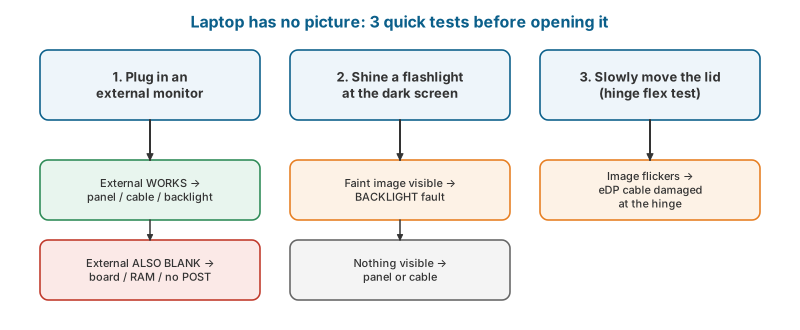
| Test | Result → conclusion |
|---|---|
| Connect an external monitor (HDMI/USB-C) | External works → internal panel, cable, or backlight fault. External also blank → mainboard/GPU/RAM/no POST |
| Shine a flashlight at the screen | Faint image visible → backlight fault (LED backlight driver, panel backlight, or backlight fuse on the board, or the eDP cable’s backlight lines) |
| Flex the lid / move the hinge | Image flickers → eDP cable damage at the hinge |
| Lines/blotches, image visible | Panel damage (replace panel) or cable |
Keyboard and touchpad
- Liquid on keyboards often kills a few keys (corroded membrane). Replace the keyboard; check the board’s keyboard connector for corrosion.
- Touchpad problems: check its flex cable, driver (Precision Touchpad drivers on Windows), and the battery — a swollen battery pushes up the touchpad, causing clicks that don’t work or a raised trackpad. Treat this as a battery-safety job.
Battery replacement
- Confirm wear (battery report), swelling, or “Plugged in, not charging” symptoms.
- Use a battery with the correct part number, voltage and connector. Quality varies greatly — buy from suppliers who give a warranty and whose cells include proper protection circuits.
- Glued batteries (common on MacBooks and ultrabooks): soften adhesive with the specified solvent (Apple’s manuals, for example, specify adhesive-removal solutions for some models), never pry against the cells with metal.
- After installation, some systems benefit from a full charge cycle so the fuel gauge calibrates. Some Lenovo/Dell models need a BIOS setting or utility for battery charge thresholds — check the customer’s settings if the “new battery won’t charge past 80%” (it may be a deliberate battery-care setting).
DC jack and charging port
- Barrel jacks are either soldered to the board (repair requires desoldering a large connector with significant heat — use preheat) or connected via a separate cable harness (easy swap).
- USB-C ports are typically soldered surface-mount with through-hole anchor legs. Replacement requires hot air, low-melt solder, preheating, and careful inspection for bridges on the fine pins. Always check the CC lines and VBUS for shorts (diode mode) before and after.
- Always test the customer’s charger. Many charging complaints are failed chargers or cables.
Hinges
Broken hinge mounts are common on laptops with plastic lids. Options: replace the lid (A-cover) with integrated hinge nuts, or repair the mounts with epoxy-based hinge repair kits. Advise the customer that a hinge repaired with epoxy is weaker than a new cover.
Cooling service
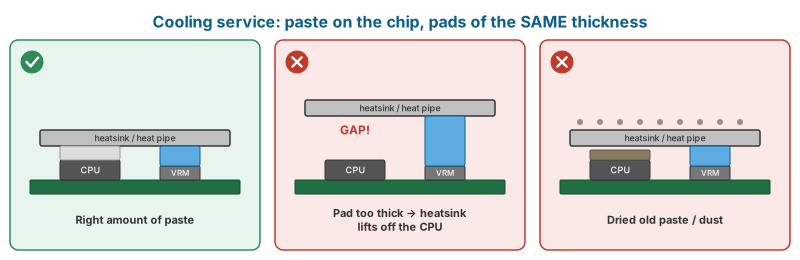
- Remove the heatsink assembly; remove all old paste with IPA.
- Clean the fan and heatsink fins (compressed air while holding the fan still — spinning a fan with air can damage its bearing or generate voltage back into the board).
- Apply fresh paste; replace thermal pads with the same thickness (measure the old ones). Too thick a pad prevents the heatsink from contacting the CPU; too thin leaves VRM or VRAM uncooled.
- Tighten heatsink screws in the numbered order printed on the heatsink.
- Verify with a stress test that temperatures are lower and stable.
RAM and storage
- Many laptops have soldered RAM (LPDDR), sometimes with one SO-DIMM slot. SO-DIMM: DDR4 has 260 pins, DDR5 has 262 pins; not interchangeable. Newer CAMM2/LPCAMM2 modules are appearing on some laptops.
- M.2 SSDs: check length (2230, 2242, 2280) and interface; some laptops require a specific mounting screw or thermal pad.
Watch and read
- Watch: Laptop panel replacement — YouTube search: laptop screen replacement
- Watch: Riveted keyboard replacement — YouTube search: laptop keyboard replacement riveted
- Watch: Cooling service — YouTube search: laptop thermal paste and thermal pad replacement
Review questions
- List six specifications to match when ordering a replacement laptop panel.
- How does the flashlight test distinguish a backlight failure from a panel failure?
- Why is a raised trackpad a safety issue?
- Why must thermal pads be replaced with the same thickness?
Lab exercises
Lab 10.1 — Replace a laptop panel, including part-number matching.
Lab 10.2 — Cooling service with before/after stress-test temperature log.
Lab 10.3 — Replace a USB-C port on a scrap board and verify with diode mode and a USB-C meter.
Progress is saved in this browser.