A Systematic Troubleshooting Method
≈ 3 min read · Print / save as PDF
Do not guess and swap parts. Ask, check, look, then measure — one block at a time — and always compare with a device that works.
Good technicians are not faster at soldering — they are faster at finding the fault. This chapter gives a method you will apply to every device in this book.
The eight-step diagnostic process
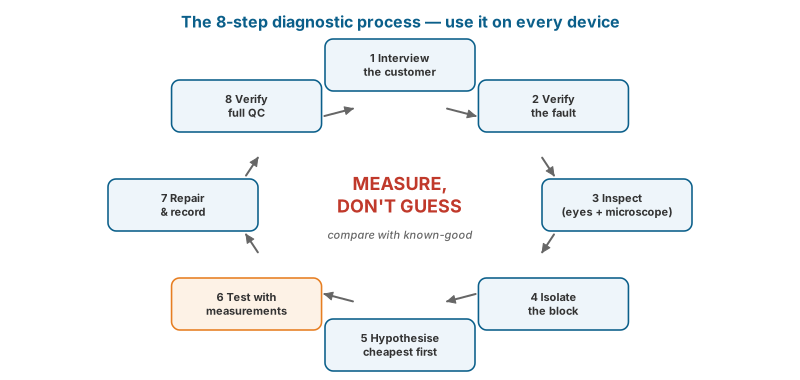
- Interview the customer. What happened? When? Was it dropped, wet, repaired before, updated, charged with a different charger? What exactly does it do now? Write it down.
- Verify the complaint. Reproduce the fault yourself before opening anything. Many “dead” phones are flat batteries or faulty cables; many “broken screens” are display settings.
- Inspect. External damage, liquid indicators, bent frames, swollen batteries, missing screws (signs of previous repair), burnt smell.
- Isolate. Divide the system into blocks and test each — power source, power delivery, boot/firmware, display, inputs. Swap known-good modules where possible (charger, battery, screen, RAM, drive).
- Hypothesise. Based on evidence, list the probable causes from most likely and cheapest to check to least likely and most expensive.
- Test the hypothesis with measurements (voltage, current, diode mode, software diagnostics).
- Repair — replace the part or component; record exactly what was done.
- Verify and quality check. Test every function, not just the one you fixed (see the QC checklists in Appendix B). Run stress tests for intermittent faults.
Divide and conquer
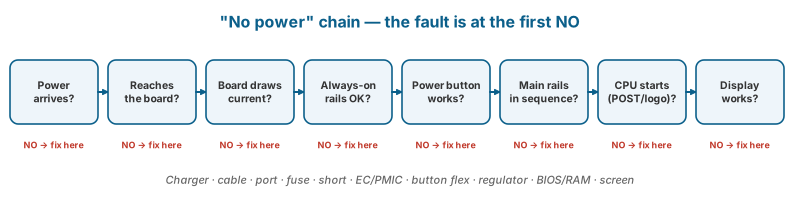
For a “no power” device, ask in order:
- Is power arriving? (Adapter output, USB-C negotiation, battery voltage)
- Is power reaching the board? (DC jack, port, cable, fuse)
- Is the board drawing current? How much? (Bench supply / USB meter)
- Are the always-on rails present? (Standby rails, EC power)
- Is the power button / power-on signal working?
- Do the main rails come up in sequence?
- Does the CPU/SoC start executing (POST, boot logo)?
- Is the display path working?
Every failure is found at the first “no” in this chain. Learn the chain for each device type (Chapters 7, 11 and 16 give device-specific versions).
Known-good substitution
Keep a labelled box of tested parts (charger, cables, RAM, SSD, popular screens and batteries) only for testing. It is the fastest diagnostic tool in the shop.
Substitution is the fastest test available in module-level repair: a known-good charger, battery, display, RAM stick or SSD. Keep a tested parts bin (clearly labelled, never sold) for this purpose.
Two cautions:
- Never install a known-good part into a device with an unresolved short on that part’s power line — you may destroy the good part. Check first.
- On iPhones, some parts (Face ID, Touch ID, and others depending on model) are paired to the logic board. Swapping them for testing may show messages or reduce functionality (Chapter 15).
Documentation
For every job record: device model, serial/IMEI (from the device), customer complaint, your observations, measurements, parts used, test results, and time spent. This protects you in disputes, builds your known-good database, and lets you calculate real profitability.
Watch and read
- Watch: Watching an expert diagnose “no power” live — YouTube search: Louis Rossmann how to diagnose no power
Review questions
- Why should you reproduce the fault before opening the device?
- List the “no power” chain from power source to display.
- What precaution must you take before installing a known-good part for testing?
Lab exercise
Lab 5.1 — Fault-finding drills. The instructor prepares ten devices with known single faults (dead charger, unseated RAM, disconnected display cable, faulty power button flex, etc.). Students diagnose each, recording all eight steps.